How To Wash A Car Properly
Professional Tips On How To Wash Your Car By Hand Without Adding Swirls And Scratches To The Paint
We at CP Car Detailing are obsessed with preventing swirls and fine scratches from forming on your paint. The most common way this paint defect occurs is through improperly washing the vehicle. You simply should not be taking your car to the car wash. They use improper techniques throughout their speedy process to ensure they ruin your car’s paint. Such defects are better described on my article on Why You Should Not Take Your Car To The Car Wash. It’s important that either a true professional wash your car by hand, or you wash the car yourself the right way.
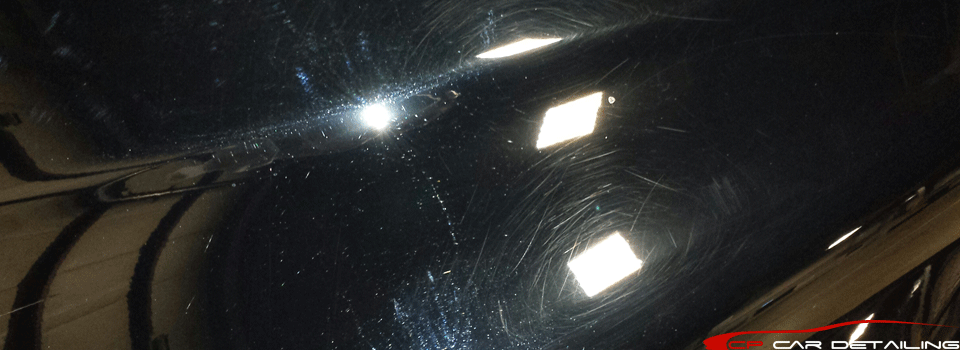
WARNING: Improper Car Wash Technique Will Make Your Paint Look Like This
Below is a “brand new” 2014 Mercedes Benz E63s with 25 miles on it, after “ONE” pass through the automatic car wash, featuring brushes to clean the surface

Here’s my detailed article on how a professional car detailer washes a car without swirling and spider webbing the paint. The foundation of my technique is the use of the Two-Bucket Method.
What You’ll Need To Wash A Car Properly By Hand:
-2 clean Five Gallon Buckets, one for your rinse water, and one for your car wash soap/water mixture (rinse them out so that no dust or dirt is in them before adding your water)
-2 Grit Guards placed at the bottom of the 5 Gallon Buckets (the grit guards will prevent your wash mitts and towels from sinking to the bottom of the bucket, where all of the dirt, grime and sediment lives)
-2 Wash Mitts
-a quality Car Wash Soap (I’ve been happy with the performance of Meguire’s Gold Class Car Wash Soap for years now, offering great lubrication and a clean rinsing finish)
-2-4 high quality Microfiber Waffle Weave Wash Towels
-a quality degreaser such as Optimum Power Clean diluted at least 50/50
How Long Does It Take To Wash A Car By Hand?
One to two hours is average, depending on the size of the vehicle, freshness of the protection/wax/sealant/coating currently on the vehicle, and how dirty the car really is.
Let’s Start The Process Of Washing Your Car By Hand
To wash a car as safely as possible, it essential to understand that lubrication is key if you ever have to wipe/touch the surface of your car. Car wash soaps are used to lubricate the paint surface when your wash mitt goes over it. Quick detailers lubricate your microfiber detailing towel when you are removing water spots from your paint after you wash your car. NEVER wipe a dirty surface with a dry towel. You will end up scratching and swirling the paint at a microscopic level. Softer paints would result in more obvious swirling. Wash the car by first rinsing the vehicle as thoroughly as possible, from top to bottom, front to back. Either do the wheels first or last using the same techniques as described below. I strongly recommend 2 more buckets designated specifically for wheel cleaning because all of the dirty brake dust should not be mixed into the same buckets used for washing the paint. I personally prefer to do the wheels first because dirty water and chemicals can hit your paint when cleaning your wheels (especially with gentle wheel brushes) and because cleaning wheels can tire you out quickly with all the bending over and such, so do it when you have the most energy! Always wash your car in the shade to prevent water spots, and away from trees and people mowing lawns (they get dirt and dust in their air, which land on your paint and lead to a higher risk of swirling your car paint).
1. Prepare two 5-gallon buckets with grit guards, one with just water (the rinse bucket), and the other one with water and car wash soap (wash bucket)
2. Add 2 wash mitts to the rinse bucket (designate one wash mitt for the top half of the vehicle, and the other mitt for the bottom half of the vehicle
3*. Rinse the entire vehicle from top to bottom, front to back. Now it’s time to start cleaning the paint! Keep in mind that if the area you are working on in steps 4-8 becomes dry, rewet the area with water for maximum lubrication! Don’t hesitate to keep the entire vehicle wet as you work through sections. Steps 4-8 need to be done at a steady pace so that water doesn’t sit on the car for a long time and cause minor water spots (it’s an annoyance you can remove during the drying process)
4. Starting on the roof, take the wash mitt designated for the top half of the vehicle, dip it into the wash bucket (with the suds activated and foamy), and gently glide the mitt along the roof.
5. After washing that half of the roof, dip the same mitt into the rinse bucket, then back to the wash bucket, and then wash another area (if an area becomes dry, rinse the area with water again to maximize lubrication, and activate the suds constantly to ensure your wash bucket continues to give you foamy suds).
6. After the roof is done, rinse the area, then work on the windows, then hood, then trunk top, then front end, then the upper halves of the door, constantly cleaning your wash mitt in the rinse bucket, then dipping into the wash, in small sections. The key is to work from top to bottom.

7. On the bottom halves of the vehicle, take your second mitt designated for the bottom half of the vehicle and continue washing as described. DO THE REAR OF THE VEHICLE LAST as this is the dirtiest part of the vehicle. When washing the sides, start from the front uppers front to back with one mitt, then use your other mitt for the bottom half, front to back.
8. For the trunk, wash top to bottom and ensure the area is rinsed well.
9. Rinse entire vehicle
10. When done rinsing the entire vehicle, remove the nozzle on the hose and use the flowing water to “flood” the paint surface. Do this on the entire car. This will remove about 80% of the remaining water on the vehicle. Be very careful to ensure the end of the hose does not touch and scratch the paint. Also make sure the flow of water is not that strong that it creates splatter.
11. To dry the vehicle, use your quality microfiber towels, and start on the roof, then windows, hood, trunk top, front end, sides (front to back, top to bottom), then rear. Lay out the microfiber on the surface to let it absorb the water, then pinch the ends of the towel and gently and slowly glide the towel towards you. Continue this gentle glide technique to prevent accidentally scratching your paint. You may then want to take a vacuum on the “blow” function or compressed air and blow out water hiding in crevices and such.
12. (optional) Follow up with your favorite quick detailer or spray wax to remove leftover water marks and/or add a quick and easy layer of protection to the paint and windows.
Washing Your Car Properly Will Keep Your Car Looking Like New
Following the above techniques will allow you to minimize the chance of swirling and scratching your paint by giving you maximum lubrication during the wash process. Minimizing swirls in your paint, especially on black cars and other dark colored vehicles will allow them to look like new forever. Nobody should ever touch a car unless they are about to wash it, or if a professional is evaluating the paint for contamination. Knowing how to wash your car yourself will prevent the need for expensive paint correction services to remove the swirls and fine scratches caused by improper wash technique. Remembering that lubrication is key when washing your car will give your car years of great shine without many paint defects, giving you greater resale value if you decide to sell your car, and making it easier to sell because your car will look better than 99% of the other vehicles out there. It may take significantly more time to wash your car yourself, but doing so is an investment that will pay itself back in spades!
How Often Should I Wash My Car?
How many times you should wash a car really depends on how often you drive it, how dirty it gets, the weather and temperature, how much paint protection you have on the car currently, how often you have the proper time you need to wash your car right and many more factors. I’d say you should wash your car ideally once a week if it’s moderately driven. Show cars and weekend toys can be washed every 2 weeks or more. Keep in mind that the more you wash your vehicle, the faster your paint protection product, whether it be a wax, sealant or glass coating will wear away. No matter how many times you wash your car, it’s important that either you or a professional car detailer wash your vehicle the right way so that it does not get swirled or scratched.
*Prior to rinsing the entire vehicle, you may want to wash and remove the bugs of the front end of your vehicle first. Rather than spraying the entire vehicle first, focusing on just your front bumper will prevent water spots from forming on the rest of your paint while it waits to be washed. If your car’s front end is covered with bugs and such, it could take an extra 10 minutes or so to clean everything up. When I’m cleaning the front bumper of bugs, insects and bird droppings, I like to first spray the dry paint with my diluted bug remover/degreaser (in this case Optimum’s Power Clean diluted 50/50). Let it sit there for about 1 or 2 minutes. The dwell time allows the product to break down the dirt, grime and bug guts so that they are easily removed when agitated. I’ll then rinse the area, wash with my wash mitt casually without worrying about every little bug , rinse, then respray the bug remover on the car and agitate with my bug sponge if all of the bugs were not removed prior. Rinse one more time and then continue to step #3 (rinse the entire car)!


